Quick Links
Introduction
19 april 2019 – Version 1.1 released
- Added support for button A, B and C.
- New case design (lid) for the 4 buttons with 6mm tactile buttons


I started this project because I did not like feeling of The64mini joystick at all, and I prefer the Suzo Arcade Joystick. Before I started the project I already ordered an existing converter but that took 1,5 week before I received it, in the meantime I had some spare time, so I decided to make a converter myself..
With this converter you can use an old Arcade joystick on the C64 Mini. It is converting the signal from the old type connector (DB9/Atari-based) to USB. It can be used on a stock C64 Mini machine, without any modifications.
Used components (bill of material):
- (Arduino) Pro Micro (clone) 16MHz/5v (ebay see image below.. that is what you need to fit in the 3D printed case)
- DB9 (d-sub 9) male connector (ebay)
- Push button momentary 7mm (ebay)
- Momentary Tactile Tact Micro Push Button 4 pins (Height 10mm 6 *6*10mm) (ebay


Pro Micro input signals
The following pins are used on the Pro Micro
VCC = Voltage supply ( 5/3.3V)
GND = Ground
2 = Joystick up
3 = Joystick down
4 = Joystick left
5 = Joystick right
6 = Joystick button 1 (fire)
7 = Joystick Button Menu
8 = Joystick Button A
9 = Joystick Button B
10 = Joystick Button C
Pins 2-6 are connected to the DB9 connector.
Pins 7-10 are connected to the separate buttons which can be used to return to the main screen of the C64 Mini,
or special options like load/save saved games.
Let’s do some wiring


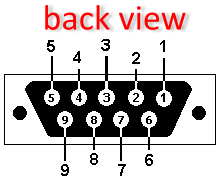
| Signal Joystick | Pro Micro | DB9 connector (Back view) |
| Up | D2 | 1 |
| Down | D3 | 2 |
| Left | D4 | 3 |
| Right | D5 | 4 |
| Button (fire) | D6 | 6 |
| +5V ( VCC)** | VCC | 7 |
| GROUND | GND | 8 |
** Not needed, only if joystick has autofire button/modification.
Solder the wires (see table above) to the corresponding pins of the DB9 male (back view) connector.

Menu, A, B & C buttons
For the Menu, A, B and C buttons solder a wire from D7-D10 to the button and the other pin of the button to a free ground hole/pin.
Original C64 Mini Joystick

You can use the original C64 Mini joystick for the optional menu buttons/functions.
Download project files
https://github.com/iamtsb/arcade2usb-converter
Case 3D design
The STL files to print your own case are included on Gitlab.


Design version 1 without extra knobs and design version 2 has another lid that holds the Menu, A, B and C buttons.
Flashing code into the Pro Micro
Arduino “boards.txt”
To make this converter work, some changes have to be made to boards.txt file.
This converter is loosely based on the Jess Technology controller as mapping device.
The boards.txt file is located in the Arduino installation folder or in your user folder if you are using Windows.
Can be found on one of these locations:
- c:\Program Files (x86)\Arduino\hardware\arduino\avr
- c:\Users\{username}\AppData\Local\Arduino15\packages\arduino\hardware\avr\1.8.2
Original lines
leonardo.build.vid=0x2341
leonardo.build.pid=0x8036
leonardo.build.usb_product="Arduino Leonardo"
Search for “leonardo.build.vid=0x2341”, in my boards.txt file.
Change the lines shown above to:
leonardo.build.vid=0x22BA
leonardo.build.pid=0x1020
leonardo.build.usb_product="C64Mini Arcade to USB converter"
Compile and upload code
To compile/upload the code into the Pro Micro use the steps below.

- Click on the menu Tools
- Select the Board “Arduino Leonardo”
- Select the Port: [Corresponding port]

- Click on the menu Sketch
- Click on Upload
If everything went well, the Pro Micro is ready to be use as converter.
Bootloader upload/fix Pro Micro (Arduino Leonardo)
If you accidentally bricked your Pro Micro/Arduino Leonardo you will need to re-flash the bootloader.
see: http://tsb.space/knowledge-base/arduino-leonardo-micro-pro-bootloader-flash/
TESTING
Other machines/software
Vice
It also will work on Vice as well, use configuration as below.

Confirmed working machines
- Vice
- The C64 Mini
- Windows 7, needs manual driver installation, see the manual to do this
- Windows 8.x, needs manual driver installation, thanks to Adeii for testing. see the manual to do this
- Windows 10, will auto detect the driver for this converter
- Linux, confirmed/tested by Adeii.
- Debian-based OS Ubuntu, LinuxMint, Backbox, SolydX. Nothing need to install, as expected from Linux.
- Here are screenshots from Backbox (using jstest-gtk to check Quick Shot 2 Turbo), driver installing on English on Win 7, custom remap of c64mini for WinUAE:
https://github.com/adeii/TSB-arcade2usb/raw/master/c64mini.zip - Some of games do not consider axial up/down as buttons, so do not work, even left/right work (eg. Great Giana Sisters, Giana’s Return), so could use firebutton for jump. But SuperTux 1/2,SuperTux Kart work excellent on Linux!
Untested (yet):
- Other machines like Raspberry PI for example
If someone can confirm that it works on an OS listed in “Untested” please let me know (contact form), so I can update the list.
Firmware compatible
Tested it with the last 1.3.1 firmware, and it works!
Difference between Arduino Leonardo and Pro Micro (clone)


Disclaimer
The project described on this page is a hobby project, I took all the effort to describe all the information on this page as completely and as carefully as possible.
I can not be held responsible for any damage to your equipment, building this project is entirely at your own risk. If you do not have the knowledge to build this project, ask someone who does have this knowledge to prevent damage to your devices.
Use at your own risk.
Other Arduino USB HID RetroJoystickAdaptors
https://github.com/mcgurk/Arduino-USB-HID-RetroJoystickAdapter/blob/master/README.md